2019. 7. 25. 17:16ㆍ해봤던것들
Python 으로 OpenCV 라이브러리 사용하기
영상처리를 하기 위해 OpenCV라이브러리를 사용합니다.
직접 필터를 만들기 위해서 OpenCV라이브러리의 filter2D를 사용합니다.
Sobel 연산
#sobel 연산
sobelX = np.array([[-1, 0, 1],
                            [-2, 0, 2],
                            [-1, 0, 1]])
gx = cv2.filter2D(img1, cv2.CV_32F, sobelX)
sobelY = np.array([[-1, -2, -1],
                            [0, 0, 0],
                            [1, 2, 1]])
gy = cv2.filter2D(img1, cv2.CV_32F, sobelY)
mag   = cv2.magnitude(gx, gy)
img1 = cv2.normalize(mag, 0, 255, cv2.NORM_MINMAX)
이전 글에서 설명한 것 처럼 Sobel은 SobelX와 SobelY로 나누어집니다.
numpy 배열로 필터를 만들어주고 변수에 넣어줍니다.
cv2.magnitude로 X필터와 Y필터를 합칩니다.
Laplacian 연산
Laplacian = np.array([[0, 1, 0],
                            [1, -4, 1],
                            [0, 1, 0]], dtype = np.float32)
g = cv2.filter2D(img2, cv2.CV_32F,  Laplacian)
img2 = cv2.normalize(g, 0, 255, cv2.NORM_MINMAX)
Sobel과 마찬가지로 numpy배열에 필터를 넣어줍니다.
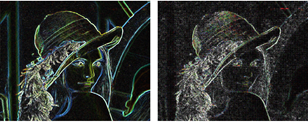
원본 이미지에 눈에 잘 보이지 않는 노이즈가 표함되어 있었는지
Laplacian 필터를 적용시킨 이미지에서는 전체적으로 노이즈가 보였습니다.
반면에 노이즈에 강한 Sobel 필터를 적용시킨 이미지에서는
원하는 부분의 Edge만 잘 검출된 것을 볼 수 있습니다.
Average연산과 Weighted Average연산은 Edge검출을 하지 않기 때문에
HOG(Histogram of Gradient)를 사용하지 않았습니다.
Average 연산
Smoothing = np.ones((3, 3), np.float32)/9
img3 = cv2.filter2D(img3, -1, Smoothing)
Weighted Average 연산
weighted = np.array([[1, 2, 1],
                       [2, 4, 2],
                       [1, 2, 1]], dtype = np.float32)
Smoothing = weighted/16
img4 = cv2.filter2D(img4, -1, Smoothing)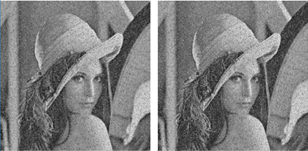
필터가 적용된 위 그림에서 노이즈가 100% 없어 지지는 않았지만
노이즈가 현저히 줄어든 모습을 확인할 수 있습니다.
또 Weighted Average 필터를 적용한 이미지가 더 선명한 것을 확인할 수 있습니다.
Yeowoolee/OpenCV-filter2D
OpenCV-filter2D. Contribute to Yeowoolee/OpenCV-filter2D development by creating an account on GitHub.
github.com